Introduction
Steel components in oil & gas, mining, petrochemical, and agricultural environments share a common enemy: surface degradation. Valve seats erode, pump components wear through, drilling tools lose geometry — and each failure triggers unplanned downtime that ABB's survey data puts at $125,000 per hour across industrial operations.
Boriding (also called boronizing) addresses this directly. It's a thermochemical diffusion process that drives boron atoms into steel surfaces at high temperatures, forming an exceptionally hard iron boride layer that outperforms most competing surface treatments on wear and corrosion resistance.
Despite its track record in severe-service environments, many engineering and procurement teams have only a surface-level understanding of the process. This guide covers:
- How the boriding process works and what governs its outcomes
- Which steel grades and applications benefit most
- Where boriding adds clear value — and where it doesn't
Key Takeaways
- Boriding is a thermochemical diffusion process that forms an ultra-hard iron boride surface layer (FeB/Fe2B) on steel, reaching 1400–2000+ HV
- It excels in abrasive, erosive, and chemically aggressive environments, including oil & gas, mining, agriculture, and petrochemical processing
- Process outcomes depend on temperature, time, steel alloy chemistry, and boriding method
- The boride layer is metallurgically bonded into the steel surface, not deposited on top of it
- The outer FeB phase is brittle and can spall if process parameters are poorly controlled
- Boriding is not suitable for all steels or all failure modes; selecting it requires failure mode analysis first
What Is the Boriding Process?
Boriding is a thermochemical surface hardening treatment in which boron atoms diffuse into ferrous metals at elevated temperatures, reacting with iron to form a dense dual-phase surface layer. The outer phase is FeB (orthorhombic crystal structure); the inner phase is Fe2B (tetragonal), positioned between the FeB layer and the steel substrate.
That crystalline structure translates directly to engineering performance: a steel component's surface becomes one of the hardest available engineering surfaces while the ductile core remains structurally intact.
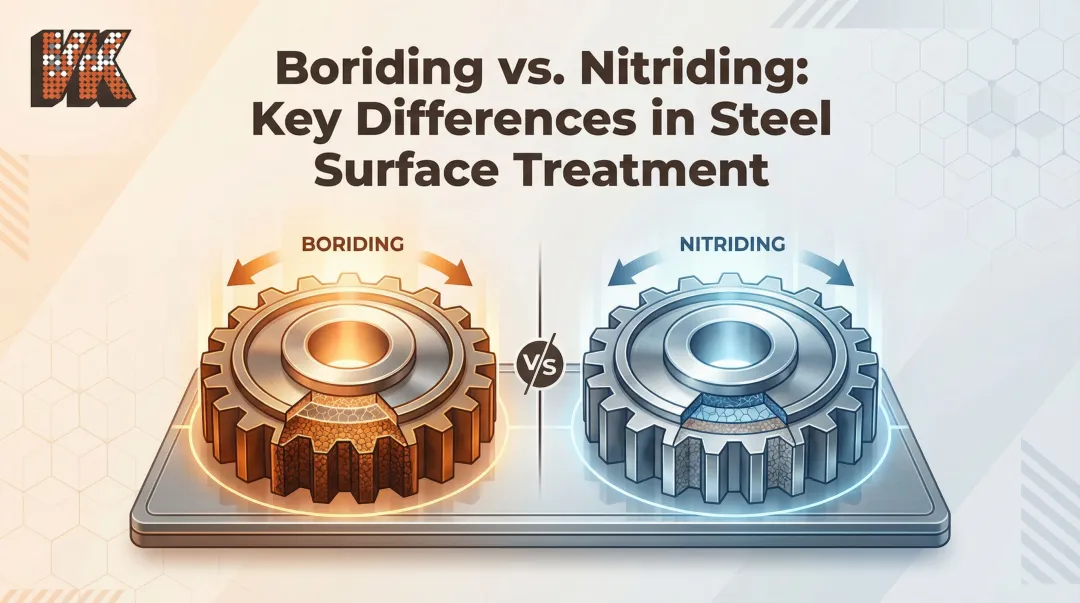
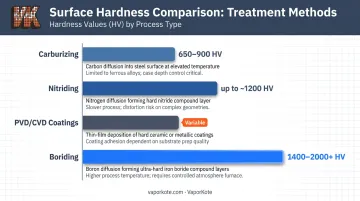
How Boriding Differs from Other Treatments
| Treatment | Hardness Range | Mechanism | Key Limitation |
|---|---|---|---|
| Carburizing | 650–900 HV | Carbon diffusion | Lower hardness ceiling |
| Nitriding | Up to ~1200 HV | Nitrogen diffusion | Better for fatigue than abrasion |
| PVD/CVD coatings | Varies | Film deposition | Adhesion-dependent; can delaminate |
| Boriding | 1400–2000+ HV | Boron diffusion | Brittle FeB phase; not impact-resistant |
Unlike PVD or CVD coatings, the boride layer forms within the substrate through diffusion rather than being deposited on the surface — which means it cannot peel or delaminate the way a film coating can.
Why Boriding Is Used in Industrial Steel Applications
The core driver is hardness where it matters most. A 2021 study in the Journal of Materials Research and Technology reports phase-specific hardness values of 1890–2340 HV for FeB and 1290–1680 HV for Fe2B — figures that dwarf standard heat-treated steel and most competitive surface treatments.
In downhole and oil sands environments, that hardness difference is the margin between a component that lasts and one that doesn't. Research published in MDPI's Coatings journal found that boronized carbon-steel tubes lost approximately 15% wall thickness under severe simulated slurry conditions, while bare carbon steel lost 100% of wall thickness under the same exposure.
What Industry Demands That Boriding Delivers
Components in high-wear environments face simultaneous threats:
- Abrasive wear from sand, mineral particles, and process solids
- Erosion-corrosion from acidic slurries and process fluids
- Adhesive wear from metal-to-metal contact under load
- Moderate thermal exposure in processing and drilling environments
Boriding addresses all four through its combination of extreme surface hardness, low friction coefficient, and chemical resistance to acids. Hard chrome and nitriding each handle one or two of these threats effectively — boriding is one of the few treatments that covers all four without stacking multiple processes.
The Cost Logic
Without surface protection, accelerated degradation of pump components, valve seats, and drilling tools compresses replacement cycles. Each replacement carries not just parts cost but the downtime cost of the service event. Boriding's value case is straightforward: components last longer between replacements, and the treatment cost is absorbed over a longer service interval.
That extended interval is what drives the ROI calculation for operators in oil drilling, mining, and petrochemical processing — sectors where unplanned downtime costs routinely exceed the price of the component itself.
How the Boriding Process Works
The process runs from surface preparation through high-temperature diffusion to post-treatment verification. Steel is exposed to a boron-rich environment at 700–1050°C, and boron atoms diffuse into the substrate to form first Fe2B, then FeB at the outer surface. The component is then cooled, verified, and returned to service.
Step 1: Surface Preparation
The component is cleaned and degreased before treatment. Depending on the method used, it is either packed into a sealed container with boriding powder (pack boriding) or coated with a boron-containing paste (paste boriding). Surface cleanliness and base metal condition directly affect diffusion uniformity: contamination or surface oxides create barriers that produce inconsistent layer thickness.
Pack boriding powder typically contains:
- Boron source: boron carbide (B₄C), typically ~5% by weight
- Activator: potassium tetrafluoroborate (KBF₄) or ammonium chloride (NH₄Cl), ~5%
- Diluent: silicon carbide (SiC) or alumina, ~90% — controls boron potential and prevents sintering
VaporKote formulates its powder mixes on-site, adjusting composition to match the specific substrate and target hardness requirements rather than using a fixed commercial recipe.
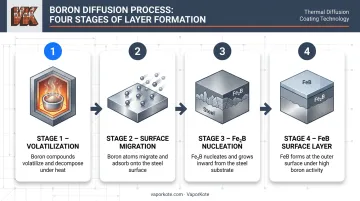
Step 2: High-Temperature Diffusion
The component is heated to 850–1050°C and held for 2–10 hours depending on the target layer depth and steel alloy. During this phase:
- Boron-containing compounds volatilize or decompose, releasing active boron species
- Boron atoms migrate to the steel surface and begin diffusing inward
- Fe2B nucleates first, growing toward the substrate under parabolic growth kinetics (layer growth slows as depth increases)
- Where boron activity is high at the outer surface, FeB forms on top of the Fe2B layer — and must be controlled to avoid brittleness
Higher temperatures accelerate layer growth but also increase the FeB-to-Fe2B ratio, raising brittleness risk. Longer treatment times increase depth but don't automatically improve phase balance. VaporKote manages this through on-site powder formulation and tightly controlled furnace cycles tuned to each substrate.
Step 3: Cooling and Post-Treatment Verification
After treatment, the component is cooled and submitted for metallurgical verification. VaporKote performs hardness testing, layer thickness measurement, and metallurgical certification against ASTM, ASME, SAE, and API codes before the component is released. For tight-tolerance applications, in-house machining capability — up to 68 inches in diameter — allows post-boriding finishing without outsourcing.
Key Factors That Affect Boriding Outcomes
No single set of parameters works across all steels. These variables govern what you actually get from the process:
Steel alloy composition — plain carbon and low-alloy steels borided readily and develop thick, uniform layers. Chromium and nickel slow boron diffusion by forming secondary borides (CrB, Ni-B) that act as diffusion barriers, producing thinner layers under equivalent conditions. High-silicon steels are also problematic — silicon is pushed into the transition zone and inhibits FeB formation and total layer growth.
Temperature and time — both follow parabolic growth kinetics. Higher temperatures accelerate growth but shift phase balance toward more FeB, increasing brittleness risk. Longer times improve depth, though they don't guarantee phase uniformity on their own.
Boriding agent composition — the ratio of boron source to activator to diluent sets the boron potential at the surface. Higher boron potential favors FeB formation; lower potential favors the tougher Fe2B phase. Adjusting this ratio is the most direct way to control phase balance.
Atmosphere control — oxidizing atmospheres degrade layer quality. Inert gas or vacuum atmospheres produce more uniform, denser layers. Especially critical for higher-alloy substrates, where oxidation competes directly with boride formation.
Component geometry — sharp internal corners, blind holes, and complex geometries create non-uniform exposure to the boriding medium. Pack and paste methods have different coverage profiles, and irregular geometry is worth raising with your service provider before treatment begins.
Understanding how these variables interact is what separates a predictable boriding result from a guessing game. Getting the combination right — alloy, temperature, agent chemistry, and geometry — determines whether the finished layer performs in service or fails early.
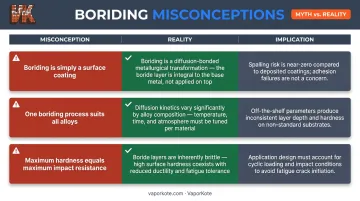
Common Issues and Misconceptions
Three misconceptions about boriding cause the most specification errors in practice. Understanding where each breaks down prevents costly process failures.
Misconception 1: "It's just a coating."
Unlike electroplating or PVD films, the boride layer is metallurgically bonded through diffusion — delamination isn't the failure mode. The actual risk is spalling of the brittle FeB phase under high compressive or impact loading. That's a process control problem, not an adhesion problem, and it requires a different engineering response.
Misconception 2: "Parameters transfer across all steels."
Applying carbon-steel boriding parameters to stainless or high-chromium alloys consistently produces thin, non-uniform, or structurally compromised layers. Chromium and other alloying elements alter boron diffusion kinetics significantly. Each substrate class requires matched process parameters — treating alloy chemistry as a variable rather than a constant is what separates reliable outcomes from rework.
Misconception 3: Hardness and impact resistance are the same thing.
Borided surfaces reach 1400–2000+ HV — extreme hardness by any measure. But the boride layer is inherently brittle. FeB fracture toughness runs at 1–2.5 MPa·m^½ versus 3–5.5 MPa·m^½ for Fe2B. That gap matters: boriding is the right call for abrasive wear, sliding contact, and erosion. It's the wrong call for impact loading or high-cycle fatigue, where a brittle surface layer becomes a crack initiation site rather than a protective one.
| Misconception | Reality | Implication |
|---|---|---|
| "It's just a coating" | Diffusion-bonded — won't peel | Failure mode is spalling, not delamination |
| "Works the same on all steels" | Alloy chemistry changes diffusion kinetics | Parameters must be matched to substrate |
| "Hard = impact resistant" | Boride layer is brittle (1–2.5 MPa·m^½) | Wrong choice for impact or fatigue loading |
When Boriding May Not Be Appropriate
Boriding adds cost. It should be specified deliberately, not by default. Here are the situations where it's the wrong choice:
- Low-wear, low-corrosion environments — the hardness premium delivers no measurable return
- Impact or fatigue-dominant failure modes — the brittle boride layer can initiate fatigue cracking under cyclic loading; nitriding or shot peening are better fits
- Aluminum or silicon-rich steels — these interfere with boride formation and typically produce unusable results
- Leaded or resulphurized steels — flagged in technical literature as unsuitable due to spalling and cracking risk
- Tight tolerances without post-processing capability — the layer adds 10–200 µm, most of it inward, but some dimensional change occurs; components with no finishing path after treatment may end up out of spec
One pattern worth watching: teams that specify boriding because it was used on a previous component generation — without re-evaluating the current failure mode — often add treatment cost without proportional benefit. Start with failure mode analysis. Surface treatment selection follows from that, not the other way around.
Frequently Asked Questions
What is the difference between boriding and nitriding for steel?
Both are thermochemical diffusion treatments, but boriding produces significantly higher surface hardness (1400–2000+ HV via iron borides) versus nitriding (up to ~1200 HV via iron nitrides). Nitriding is generally preferred where fatigue resistance is critical; boriding excels in severe abrasive wear and corrosion scenarios where hardness is the primary requirement.
What types of steel are best suited for boriding?
Plain carbon steels, low-alloy steels, tool steels, and cast iron borided readily and develop thick, uniform layers. High-chromium and high-nickel stainless steels can be borided but require adapted parameters due to diffusion barriers, producing thinner layers. Steels with aluminum, silicon, lead, or sulfur additions are generally not suitable candidates.
How thick is the boride layer produced by boriding?
Layer thickness typically ranges from a few tens of microns to approximately 200 µm, depending on steel type, temperature, treatment time, and boriding method. Plain carbon steels develop thicker layers than high-alloy steels under equivalent conditions.
Does boriding affect the dimensional tolerances of steel components?
Yes — boriding adds measurable layer thickness that must be accounted for in tight-tolerance applications. Most of the layer forms by inward diffusion, so dimensional growth is relatively small, but critical-tolerance components may need post-boriding finishing. VaporKote's in-house machining capability handles this for components up to 68 inches in diameter.
How does boriding compare to carburizing in terms of hardness and wear resistance?
Boriding produces significantly higher surface hardness (1400–2000+ HV) versus carburizing (650–900 HV), making it the stronger choice for severe abrasive wear. Carburizing delivers a tougher case better suited to impact and fatigue loading — the right process depends on which failure mode dominates in service.
Can boriding be applied selectively to specific areas of a component?
Paste boriding allows selective area treatment — the boron-containing paste is applied only to surfaces requiring hardening, protecting critical contact zones without treating the entire component. This is particularly useful for large or geometrically complex parts where full-component treatment would be impractical or unnecessary.